• Skip to primary navigation
  • Skip to main content
  • Skip to primary sidebar
Gokul Deepak

Gokul Deepak

GoCool and Debug

  • Home
  • Terraform
  • WordPress
  • Android
  • How to
  • About Me

Android

How to convert CR2 to JPG format for free and easy

June 18, 2018 by Gokul Deepak S Leave a Comment

Today let us see how to convert CR2 to JPG format for free and easy. Most of the time when we take pictures from our SLR camera the default format is CR2. Actually this happened to me in accident. My settings changed unknowingly and all my pictures were in CR2. While I’m trying to convert I faced 2 issues.

  1. Sacrificing Quality
  2. Sacrificing Money

But I decided to sacrifice nothing. And after trying many of the desktop apps, web based apps and mobile apps I have finally found a single app which did everything without charging even a single penny. Remember I’m not marketing for that product but just I wish to share the product which saved me. Because everyone in my family was angry on me for unable to take printout of the pictures taken in an important function.

Now coming to Point I’m mentioning the Android app name which did its magic.

Raw2DNG

This app says it can convert it into DNG. But there is also an option to convert it into JPG. It took nearl 30 minutes to run the complete batch of 185 pictures. All got converted to JPG from CR2 format without sacrificing quality. It is a freeware too. Hope this will help you too.

Filed Under: Android

Open Camera vs Bacon Camera Which is best

September 4, 2017 by Gokul Deepak S Leave a Comment

To know Open Camera vs Bacon Camera Which is best we have to be clear that Bacon camera is made for One Plus One with customisation.

If you have changed your custom ROM and flashed minimum Gapps you will undergo a disastrous effect of not having a good camera app. In m scenario, I have OnePlus one with new Lineage OS. The default camera app is very worst. It always throws me some errors. So finally tried to find a free camera app to use for normal activities. It is easy to shortlist two apps. But choosing one among them is a little bit difficult.

Open Camera is the better option if you want a care free shots. You can simply open the application and shoot photos. It has no ads and 100% free. Really an appreciatable job.

Bacon Camera needs some customising settings. you have to choose iso, speed, EV. It is like using a DSLR camera which has full manual control. So your camera will be under your control. But you need to know some basic details on technical photographic words like iso, Speed, ev etc. you will see ads often when you are trying to view the pictures or do some other operations.


So if you need more customing prefer Bacon Camera and for care, free shots download Open Camera.


Link to install Bacon Camera https://play.google.com/store/apps/details?id=com.fgnm.baconcamera&hl=en

Link to install Open Camera https://play.google.com/store/apps/details?id=net.sourceforge.opencamera


Filed Under: Android

Must Have Android Apps September 2017

August 31, 2017 by Gokul Deepak S Leave a Comment

On this month of September, I’m upgrading my lineage OS in my OnePlus One. I have rooted the mobile and so some apps that I have installed are not available in Google Playstore.  I will forget the apps and so here to remind myself I’m writing it in a post.

  1. ’33’ Game by Dhivya Karthi
  2. Google Authenticator
  3. Aatchiyar IAS
  4. Google Docs
  5. Uber
  6. Bhim
  7. Tamilnadu Esevai
  8. Adsense
  9. Airdroid
  10. Allo
  11. Amazon Shopping
  12. Appdetox
  13. Black Player
  14. CamScanner
  15. Clear IAS
  16. DigiLocker
  17. English Tamil Offline Dictionary
  18. Evernote
  19. Expense Manager
  20. File Manager by Asus
  21. Flud
  22. GokulDeepak
  23. Google Indic Keyboard
  24. Greenify
  25. Hola
  26. Imo
  27. Internal Audio Plugin (Root)
  28. IRCTC Rail Connect
  29. Jio 4G Voice
  30. Just Reminder
  31. Google Keep
  32. Learning Space
  33. Airtel Mitra
  34. MP3 Video Converter
  35. My Airtel
  36. Myjio
  37. Open Camera
  38. RecMe
  39. Root Browser
  40. Shareit
  41. Su[erSu
  42. Telegram
  43. TimeTune
  44. TN Government
  45. TNPSC Forum
  46. Trello
  47. Truecaller
  48. Tubemate
  49. VideoShow
  50. VLC
  51. Voice Recorder Pro-Splend Apps
  52. Whatsapp
  53. WordPress
  54. WriterP
  55. Xodo

Filed Under: Android

Lineage OS VoLTE for OnePlus One True or Fake?

May 22, 2017 by Gokul Deepak S Leave a Comment

You might have seen in many blogs which says lineage os supports volte in OnePlus one(opo). They have published a false post because, in lineage os website they have mentioned they would provide lineage os which would support volte. They have announced this as a news item on April 1. But it was just a prank. They said April fool to us. So lineage os won’t give volte support. They have also said that only OEM can give you such an update. You may have a doubt what is OEM. It is nothing but Original equipment manufacturer.
Now I’m using OnePlus One with lineage os. Unfortunately I was filled by them. Any how they have given nougat version and I love this custom ROM. I’m missing some CM14 features. Especially in customising the theme but feeling this fresh OS is satisfactory.
Final note: if you have OnePlus One and still waiting for volte support. I’m sorry for you.

Filed Under: Android Tagged With: Lineage OS, OnePlus One

Downgrade from Lollipop to Kitkat for Micromax Canvas A1 (Android One)

August 29, 2016 by Gokul Deepak S 8 Comments

I was waiting for Android L for many days. when it was released I downloaded and installed without wasting time. But after Installing I hated this new OS. It was confusing and also a trouble maker. So now I want to downgrade from lollipop to kitkat for Micromax Canvas A1. It is easy to upgrade our Micromax Canvas A1 mobile from kitkat to lollipop but we can’t roll back to kitkat in a single click. we have to root our mobile to do so.

I have read in XDA forum but It is not easy to understand. and so I had undergone lot of studies about each and every term and then found the method. Now here I’m sharing with you in simple layman language so that even a newbie can root your mobile and install Android 4.4 (Kitkat).

Lollipop to Kitkat for Micromax Canvas A1:

1. Root Micromax canvas A1:

STEP 1: Backup your Device (Contacts, Sms, WhatsApp to external SD card (Compulsory backup) and Backup External SD card to a computer or Pendrive (Optional Backup).

STEP 2: Download

If your current OS is Android Kitkat then Download this. Android 4.4 KitKat Super SU file = http://download.chainfire.eu/396/Supe… If that link is not available then download from Our Server.

If your current OS is Android Lollipop then Download this. Android 5.1 Lollipop Super SU file= http://download.chainfire.eu/696/Supe… If that link is not available then download from Our Server.

Paste it in root folder in SD card

STEP 3: Install ADB toggle in your android mobile. Open the application and Turn on USB debugging on the device. Software is available in http://adbdriver.com/downloads/ (Download ADB toggle from our server)

STEP 4: Connect your phone to PC and run ADB Driver Installer software and install drivers. Software is available in http://adbdriver.com/downloads/ (Download ADB Driver from our server)

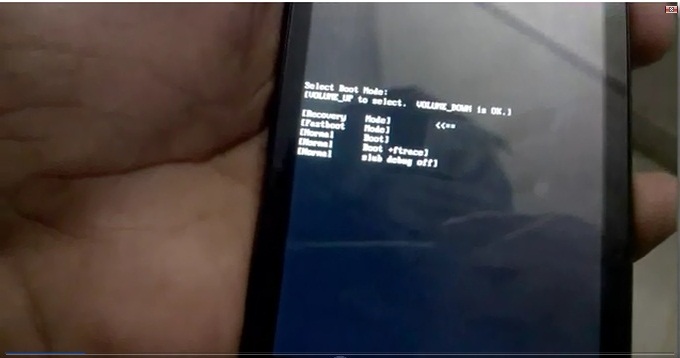
STEP 5: Power off the mobile phone. Press Power button and Volume + button at the same time so that to open bootloader mode.

Root Micromax Canvas A1

STEP 6: Select Fastboot mode by clicking Volume – button

STEP 7: Download Android_One_Bootloader_Unlocking_Script. -> extract or unzip the folder

STEP 8: Open the folder ‘Android_One_Bootloader_Unlocking_Script’ and Left click on the empty space of that folder by holding Shift key

STEP 9: Select ‘Open command window here’

STEP 10: Connect your device and type ‘fastboot devices’ on the command. If the device is detected then you will get some hexadecimal numbers and fastboot text. If nothing appears repeat from step 3.

STEP 11: Type ‘fastboot oem unlock’ and hit enter

STEP 12: type ‘fastboot format userdata’

STEP 13: type ‘fastboot reboot’

Your device will reboot now. Then power off you mobile once again and then Press Power button and Volume + button at the same time so that to open bootloader mode.

STEP 14: Download CWM RECOVERY.zip= https://www.androidfilehost.com/?fid=23681161096069936 (Our Server Mirror)

Copy this recovery.img file to the folder ‘Android_One_Bootloader_Unlocking_Script’

Connect your android device to PC if you have disconnected to reboot mobile.

STEP 15: Type ‘fastboot boot recovery.img’

STEP 16: Now in your Micromax Canvas A1 mobile choose ‘Install Zip’ –> ‘Choose zip from external SD card’ –> Select Super SU file copied in Step 2

After installation completed ‘go back’ –> ‘Reboot System now’

Success: You have successfully rooted your Micromax Canvas A1 mobile!! (We are two process ahead to downgrade from lollipop to kitkat for Micromax Canvas A1.

Verify: To check that download root checker basic application in your android mobile and click verify. https://play.google.com/store/apps/details?id=com.joeykrim.rootcheck&hl=en

2. Install CM11

STEP 1: Download CM11 (Download from our server).  Paste it in root folder in SD card.

STEP 2: Power off the mobile phone. Press Power button and Volume + button at the same time so that to open bootloader mode.

STEP 3: Select Fastboot mode by clicking Volume – button

STEP 4: Open the folder ‘Android_One_Bootloader_Unlocking_Script’ and Left click on the empty space of that folder by holding Shift key

STEP 5: Select ‘Open command window here’

STEP 6: Connect your device and type ‘fastboot devices’ on the command. If the device is detected then you will get some hexadecimal numbers and fastboot text.

STEP 7:  Type ‘fastboot boot recovery.img’

STEP 8: Now in your Micromax Canvas A1 mobile choose ‘Clear user data’ (Wipe Data / Factory Reset).

STEP 9: After the wipe process completes, return to main Recovery menu.

STEP 10:  choose ‘Install Zip’ –> ‘Choose zip from external SD card’ –> Select CM11 copied in Step 1

After installation completed ‘go back’ –> ‘Reboot System now’

Success: You have successfully installed with CM11!! (Still One Process ahead to downgrade from lollipop to kitkat for Micromax Canvas A1.

3. Stock ROM using SP Flash tool:

Step 1:Download SP Flash tool and Stock ROM and Extract both of these files.

Step 2: Install ADB toggle in your android mobile. Open the application and Turn on usb debugging on device. Software is available in : http://adbdriver.com/downloads/ (Download ADB toggle from our server)

Step 3: Connect your phone to pc and run ADB Driver Installer software and install drivers. Software is available in: http://adbdriver.com/downloads/ (Download ADB Drivers from our server)

Step 4: Power off your Android Smartphone and remove the battery if it is removable battery.

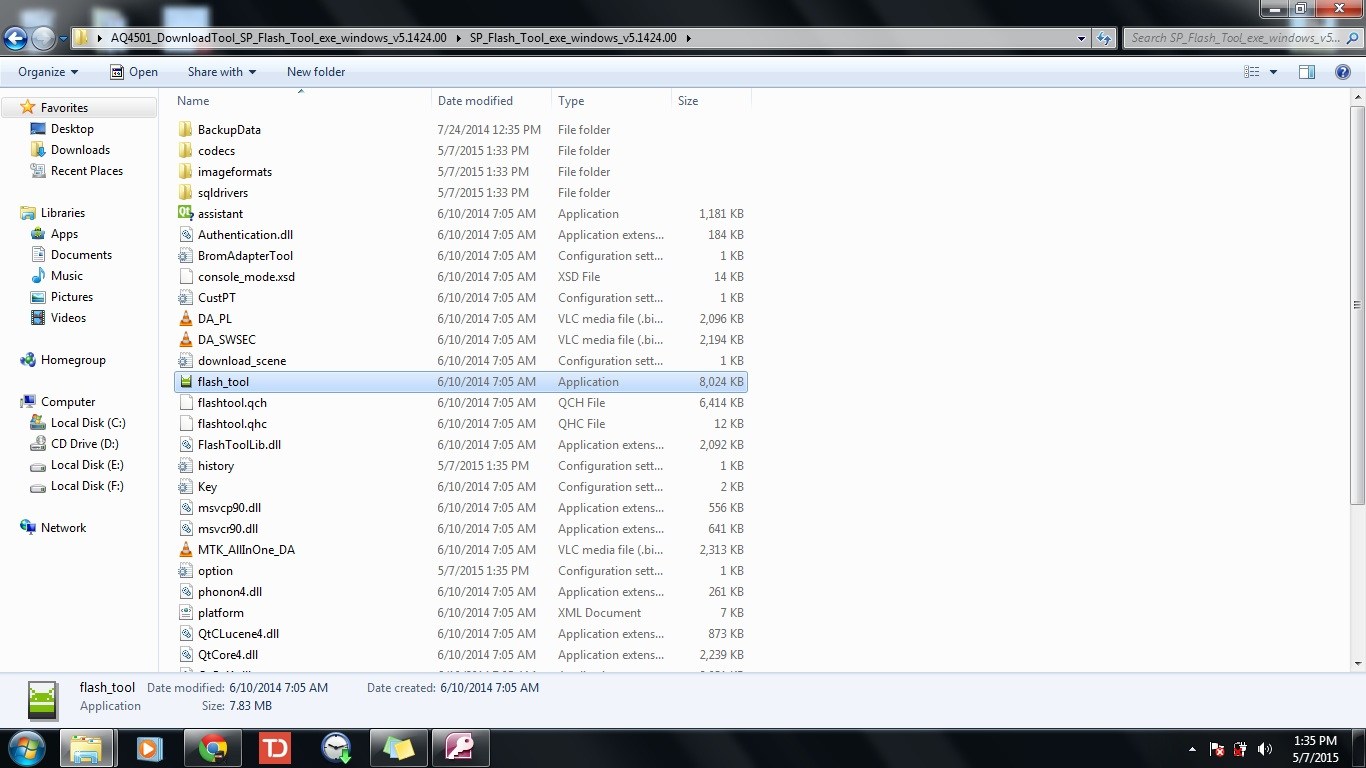
Step 5: After extracting SP Flash tool folder open flashtool.exe file as shown in image below

Stock ROM using SP Tool Android one

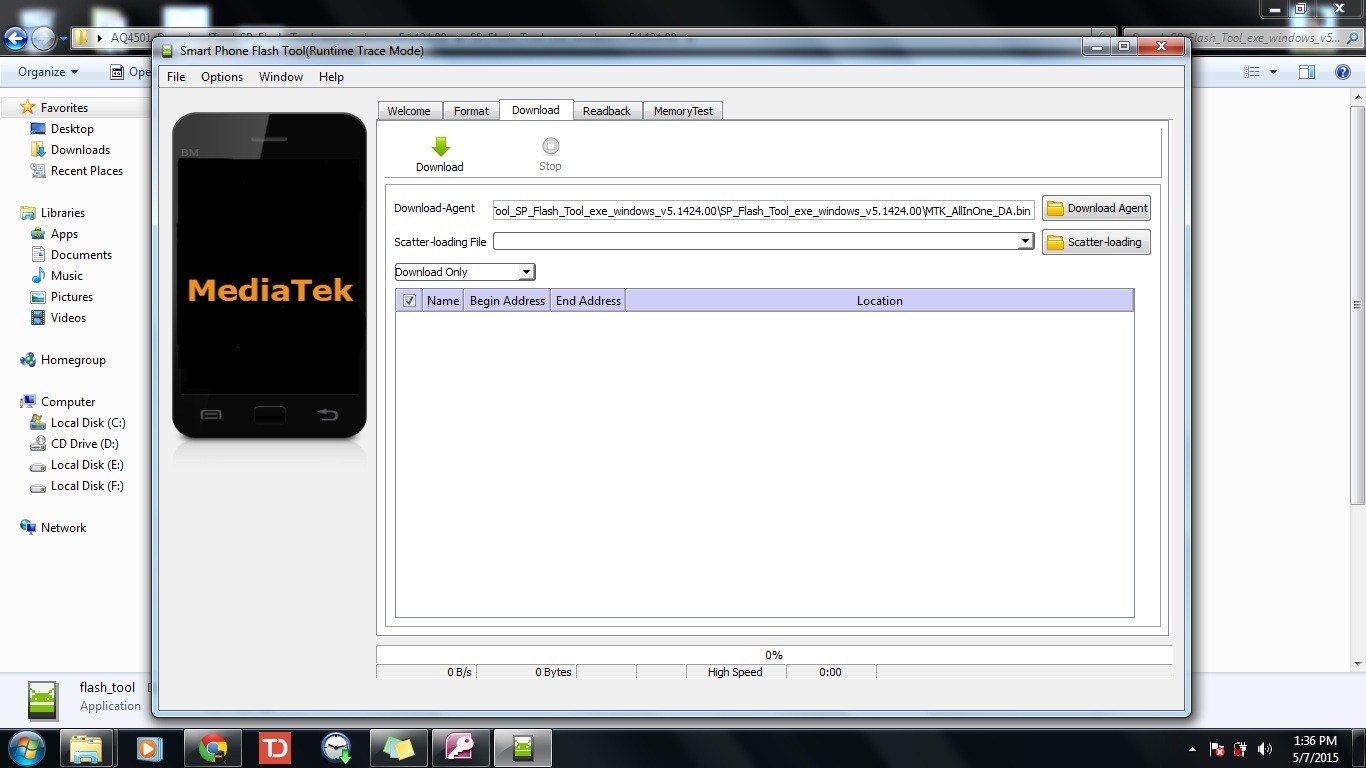
Step 6: once the Smartphone Flash tool (SP flash tool) is launched. click on scatter-loading button as shown in the picture

Stock ROM using SP Tool Android One

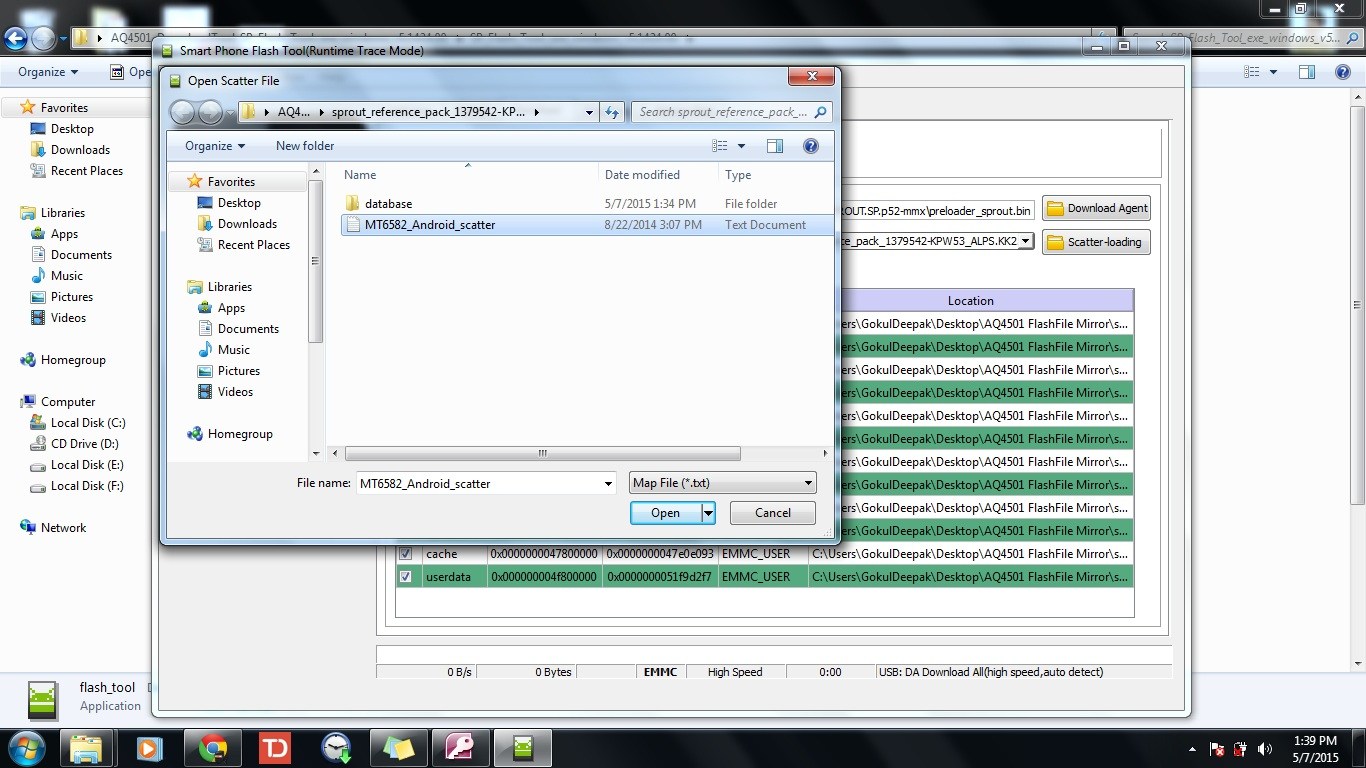
Step 7: Now a new window will appear to browse for files. go to extracted Stock ROM folder and any .txt file as shown in the picture below. as this is the scatter file the name of the file even contains the Same word so choose that scatter file.txt and click open.

Stock ROM using SP Flash Tool

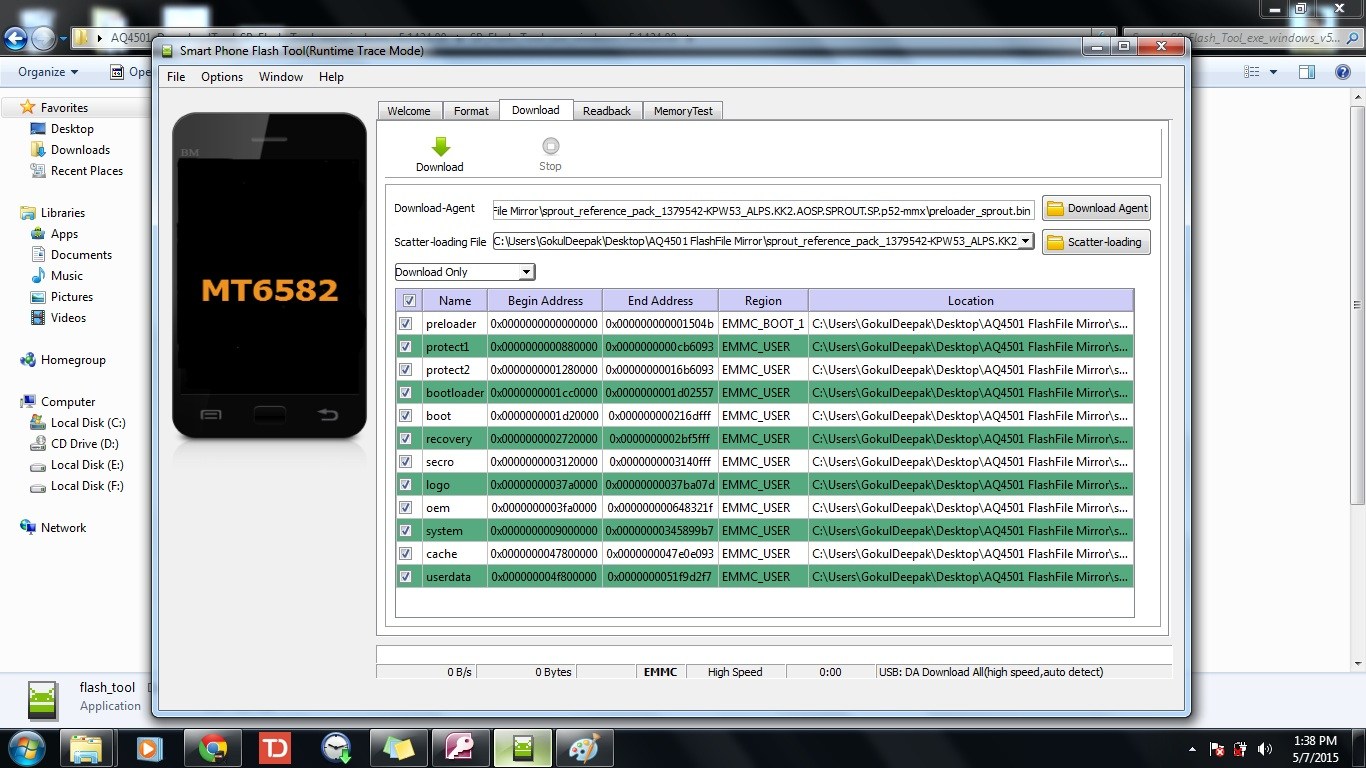
Step 8: Now click on Download button in the SP flash tool.

Stock ROM using SP Flash tool Micromax Android

Step 9: Now connect your Android mobile with the computer after removing battery from it. if it does not has removable battery then no problem with that too. After connecting press volume up or volume down button so that computer may easily detect the phone.

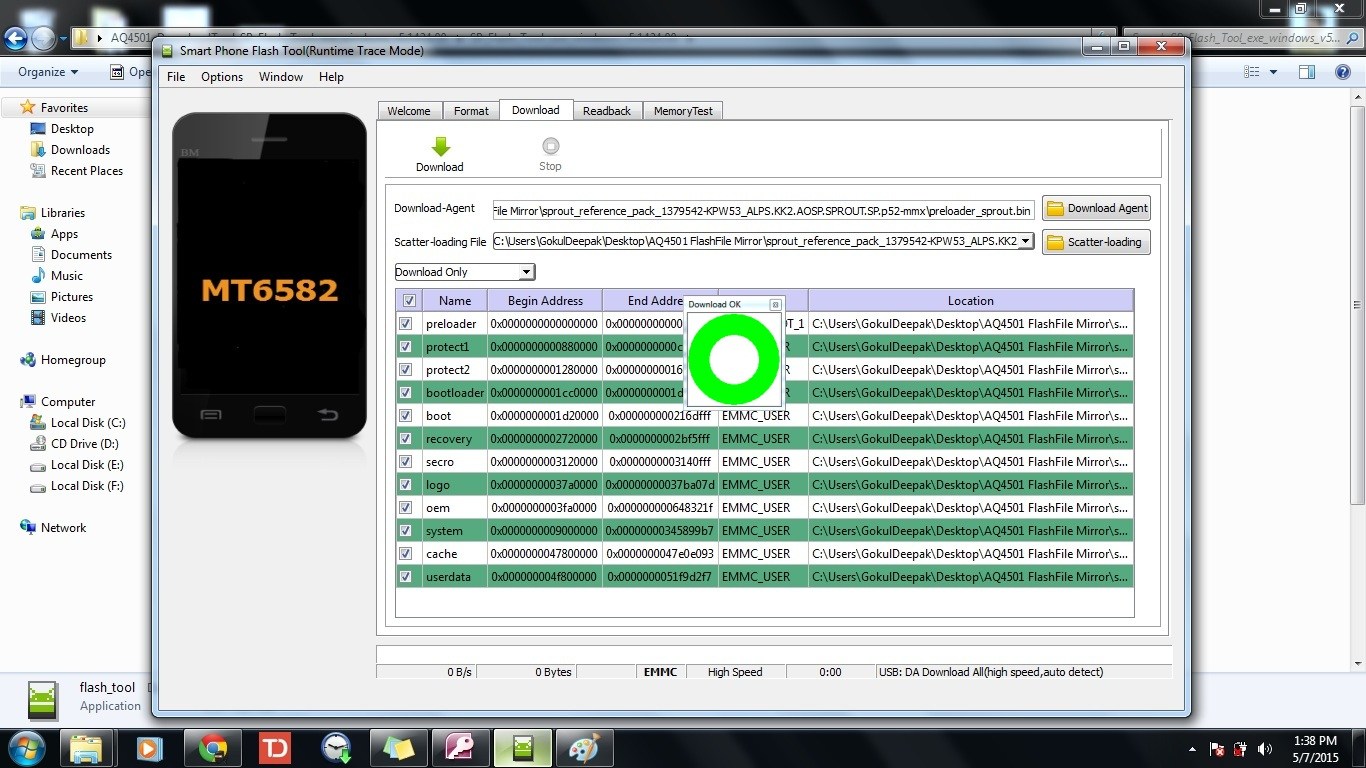
Step 10: Once if the download is completed a small window with green circle and ok will appear

Stock ROM using SP Flash Micromax Canvas

Step 11: Close SP flash tool application and disconnect android mobile from the computer.

Success: Now we had successfully installed the Stock ROM. lollipop to kitkat for Micromax canvas mission is success.

We had replaced our Micromax Canvas A1 Android lollipop with Android Kitkat.

You May Also Like:

  • How To Root Micromax Canvas A1 (Android One)
  • How To Install CM 11 (Cyanogenmod 11) in Micromax Canvas A1
  • How To flash Stock ROM using SP Flash Tool

Filed Under: Android Tagged With: Android One, Custom ROM, How to

How to Stock ROM using SP flash

August 29, 2016 by Gokul Deepak S 2 Comments

We can Stock ROM using SP flash tool. Here I’m explaining how to stock ROM using SP flash tool. Before that let us look at the brief information on Stock ROM, Custom ROM and what are all its differences. Follow the procedure given by me step by step. I have tried to explain everything in a clear way that a novice too could understand what to do and what is happening. But as every techie warns us before their instruction let me also warn, “Try this at home at your own risk”.

Why to Stock ROM?

We may have changed our ROM from Default android version to some other custom ROM and then feel irritated or insecure with those custom ROM and rush to come back to our Stock ROM or some of us may have upgraded from Android Kitkat to Android Lollipop with a joy and don’t know how to come back from Lollipop to kitkat after feeling the terribleness in lollipop ROM.

What is the difference between Stock ROM and Custom ROM?

There are two types of Android OS. Stock ROM and Custom ROM. Where Stock ROM is one which was developed by the manufacturer of the device itself. So the Stock ROM is the default ROM of the device and Custom ROM is where an extra ROM which can be flashed in the device which has required configuration.

Procedure for how to stock ROM using SP Flash tool:

Step 1:Download SP Flash tool and Stock ROM and Extract both of these files.

Step 2: Install ADB toggle in your android mobile. Open the application and Turn on usb debugging on device. Software is available in : http://adbdriver.com/downloads/ (Download ADB toggle from our server)

Step 3: Connect your phone to pc and run ADB Driver Installer software and install drivers. Software is available in: http://adbdriver.com/downloads/ (Download ADB Drivers from our server)

Step 4: Power off your Android Smartphone and remove the battery if it is removable battery.

Step 5: After extracting SP Flash tool folder open flashtool.exe file as shown in image below

Stock ROM using SP Tool Android one

Step 6: once the Smartphone Flash tool (SP flash tool) is launched. click on scatter-loading button as shown in the picture

Stock ROM using SP Tool Android One

Step 7: Now a new window will appear to browse for files. go to extracted Stock ROM folder and any .txt file as shown in the picture below. as this is the scatter file the name of the file even contains the Same word so choose that scatter file.txt and click open.

Stock ROM using SP Flash Tool

Step 8: Now click on Download button in the SP flash tool.

Stock ROM using SP Flash tool Micromax Android

Step 9: Now connect your Android mobile with the computer after removing battery from it. if it does not has removable battery then no problem with that too. After connecting press volume up or volume down button so that computer may easily detect the phone.

Step 10: Once if the download is completed a small window with green circle and ok will appear

Stock ROM using SP Flash Micromax Canvas

Step 11: Close SP flash tool application and disconnect android mobile from the computer.

Success: Now we had successfully installed the Stock ROM.

You May Also Like:

  • Lollipop to Kitkat in Micromax Canvas A1
  • How To Root Micromax Canvas A1 (Android One)
  • How To Install CM 11 (Cyanogenmod 11) in Micromax Canvas A1

Filed Under: Android Tagged With: Android One, How to, Stock ROM

  • Page 1
  • Page 2
  • Go to Next Page »

Primary Sidebar

Popular Pages

  • Home
  • How to find the date of the Facebook group it was created

Archives

Categories

  • Android
  • Apache
  • AWS
  • Blogger
  • Computer Tips
  • DevOps
  • Docker
  • Earn
  • Facebook Tips
  • Git
  • Google Tips
  • Hosting
  • How to
  • Laptop Tips
  • Laptops
  • Linux
  • Mobile
  • MongoDB
  • Nginx
  • Node JS
  • Notepad++
  • PostgresQL
  • Terraform
  • Ubuntu
  • Wordpress
  • Xenforo

Tags

Android Android One AWS Bluehost Comparisions Custom ROM Elementor Facebook Genesis Genesis Sample Theme Google Drive How to Lineage OS Notes OnePlus One OwnCloud Rooting Smartphones Stock ROM Studiopress Tomcat Wordpress plugin

Copyright © 2025 · Maintained by GokulDeepak


Loading Comments...